Pixel Art — Shrinking
How to shrink a creature sprite without mess its outline

Painting a small image pixel by pixel is called Pixel Art. Even when we use the ‘bucket’ tool to paint many pixels at once, we still have CONTROL over each pixel.
The problem with Pixel Art is that often a single pixel or a pair of pixels has to express many things, requiring the artist to be very, very skilled and spend a lot of time experimenting.
So, sometimes people paint a bigger picture and shrink it later. Which is not a Pixel Art technique, but it does the job easily.
In this small article we are going to examine this technique a bit.
Note: This article considers only shrinking algorithms that merge pixels. So, this is not applicable to the Nearest Neighbour algorithm, for example.

Above we see a simple 200 x 200 pixels image.
Below we see that image scaled down to 100 x 100 pixels.

Let’s take a closer look.

The orange rectangle was perfectly reduced.
But the blue rectangle got blurry borders.
Why?
Except for the colors, the blue rectangle is identical to the orange rectangle.
The difference in their positions causes different results!
Let’s see 2 tiny rectangles being reduced.
Example A

Take a tiny rectangle: 4 pixels wide and 1 pixel high (4 x 1 pixels):
[ white white black black ].
Now, shrink it to 2 x 1 pixels rectangle.
The algorithm combines the value of the first pair of pixels:
white + white → white
Then the algorithm combines the values of the second pair of pixels:
black + black → black
The new rectangle is [ white black ].
We have a perfect reduction!
Example B

Now, take a tiny rectangle: 4 pixels wide and 1 pixel high (4 x 1 pixels):
[ white black black white ].
Now, shrink it to 2 x 1 pixels rectangle.
The algorithm combines the value of the first pair of pixels:
white + black → grey
Then the algorithm combines the values of the second pair of pixels:
black + white →grey
The new rectangle is [ grey grey ].
The reduced rectangle does not match the original one!
In Practice
Enough theory!
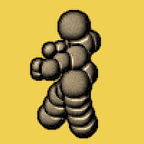
The purpose of this article is to show the trick to reduce images that have blank areas (completely transparent); usually any video game creature sprite.
In this case (sprite with blank areas) we don’t care about merge or blur inner pixels. Blur inner pixels is exactly what we expect (assuming we could not achieve a better result just by using Pixel Art on the sprite at normal size). Anyway we can always apply small corrections using Pixel Art later.
Our problem is avoid mess the (external) outline, often black, with the blank area around. This weakens the outline and also creates ugly translucent pixels in the neighbourhood.
Repositioning the creature inside the sprite is not a solution because the outline uses to be so irregular that we can’t protect all parts while shrinking.
The Solution
So… what’s the trick?
- create the outline in the final size (before scale up)
- scale up the image, doubling width and height, in pixelated mode
- edit the image without displacing its content
- scale down to the previous size in smooth mode
In case you are editing with BobSprite: there are two buttons that do just that for you.

That’s it. It is easier to do than to read the instructions!